
Magento cron job is an important component for correct performance. It is widely used for running actions that are performed on schedule, such as indexing and caching, sitemap generation, currency rate updates, and many more as well.
However, today we would like to explain in detail how you can make cron setup with no issues. The configuration process can vary a bit depending on your site control panel (cPanel, Plesk, etc).
What Are Magento 2 Cron Jobs and Why They Matter
Magento cron jobs are server‑scheduled tasks that execute repetitive operations automatically rather than requiring you to run them manually. These tasks include:
Reindexing catalogs
Sending transactional and marketing emails
Updating currency exchange rates
Generating sitemaps
Cleaning old logs and sessions
Running custom extensions’ scheduled logic
Without properly configured cron jobs, critical operations may not run as expected, leading to stale data, broken features, or customer experience issues.
How often should you run cron executions for Magento?
Our recommendation is to run Magento cron job not manually every 1 minute. We have seen various recommendations, from once in an hour to once a minute, but once every 1 minute, from our experience, is the right choice for every Magento shop. If you set up a cron job for running every 1 minute and use SSH, the part of the command that is responsible for the schedule will look like this:
*/1 * * * *
How to Install Magento 2 Cron
First, as you start working with Magento, you need to install the Magento 2 cron. To do this, you need to log in to your Magento server as the file system owner, navigate to the project root, and enter the following command:
bin/magento cron:install
If you need to rewrite an existing crontab, use --force like this:
bin/magento cron:install --force

To verify the new crontab, enter the following command:

crontab -l

If everything is ok, you will see an output like this:

#~ MAGENTO START c5f9e5ed71cceaabc4d4fd9b3e827a2b

* * * * * /usr/bin/php /var/www/html/magento2/bin/magento cron:run 2>&1 |
grep -v "Ran jobs by schedule" >> /var/www/html/magento2/var/log/magento.cron.log

#~ MAGENTO END c5f9e5ed71cceaabc4d4fd9b3e827a2b
How to Configure Cron in Magento Admin
Magento also lets you tune cron scheduling behavior from the admin panel:
Go to Stores → Configuration → Advanced → System → Cron (Scheduled Tasks).
Here you’ll find settings for each cron group that Magento and third‑party extensions add.

Configure:
Generate Schedules Every: how often Magento creates future job entries.
Schedule Ahead for: how far into the future cron tasks are scheduled.
Missed if Not Run Within: threshold after which a task is marked as missed.
History Cleanup Every: how often old cron data is cleared.
Success/Failure History Lifetime: how long completed tasks stay in the database.
Use Separate Process: if cron groups should run independently.
Click Save Config to save your changes.
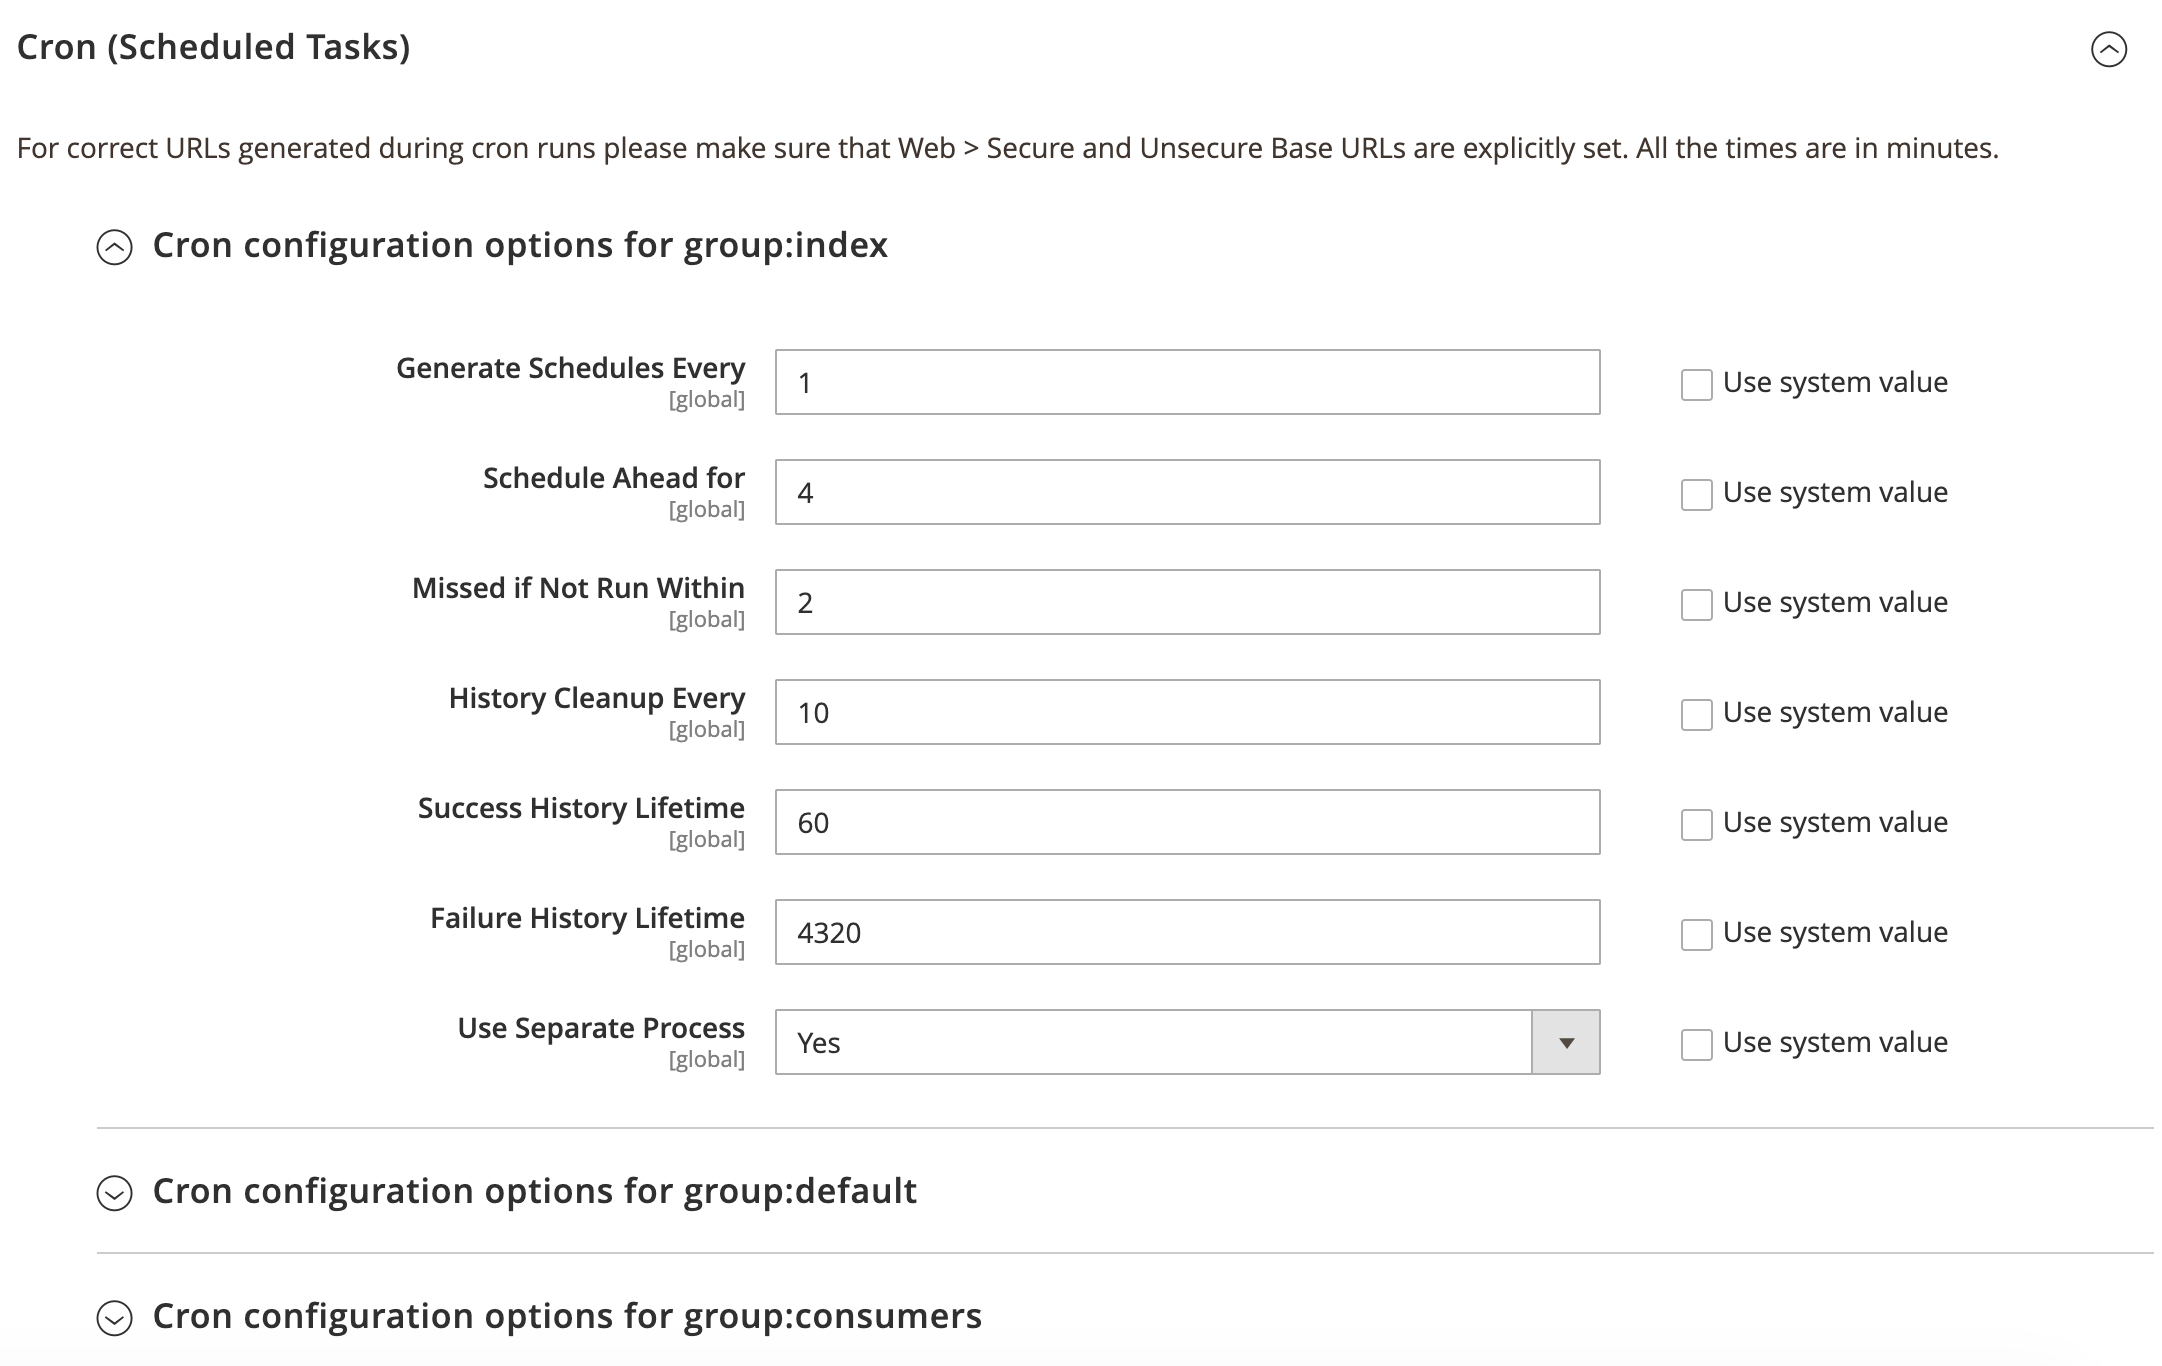
These settings help control performance and cleanup behavior for cron jobs in Magento’s internal scheduler.
How to Create a Custom Cron Job in Magento 2?
1. Define the Cron Job in crontab.xml
Create the crontab.xml file in your module’s app/code/Vendor/Module/etc/ directory to define your cron job:
<?xml version="1.0"?>
<config xmlns:xsi="http://www.w3.org/2001/XMLSchema-instance"
      xsi:noNamespaceSchemaLocation="urn:magento:module:Magento_Cron:etc/crontab.xsd">
    <group id="default">
        <job name="vendor_module_custom_job" instance="Vendor\Module\Cron\Custom"
        method="execute">
            <schedule>*/1 * * * *</schedule>
        </job>
    </group>
</config>
This cron job will run every 1 minute.
2. Create the Cron Class
Create a class to handle your cron job logic in app/code/Vendor/Module/Cron/Custom.php:
<?php
namespace Vendor\Module\Cron;
use Psr\Log\LoggerInterface;
class Custom
{
    private $logger;
    public function __construct(LoggerInterface $logger)
    {
        $this->logger = $logger;
    }
    public function execute()
    {
        $this->logger->info('Custom cron job executed.');
    }
}
This simple class logs a message when the cron job runs. Replace it with your custom task logic as needed.
Adding a new Magento 2 cron task via SSH (system crontab method)
Log in to the server via SSH and switch to the user that runs your web server or PHP-FPM. Then run the crontab -e command to edit this user’s cron tasks. You will see a text editor where you can add or modify cron entries.
Starting from a new line, add a record similar to this:
*/1 * * * * /usr/bin/php /path/to/your/magento/bin/magento cron:run |
 grep -v "Ran jobs by schedule" >> /path/to/your/magento/var/log/magento.cron.log
Make sure to replace /usr/bin/php and /path/to/your/magento with the actual paths on your server.
Save the changes and close the file. If everything is configured correctly, the crontab -l command will show the newly created cron task, and Magento will start executing scheduled jobs every 1 minute.
Adding a new Magento cron task via cPanel
To set up a new cron task for Magento 2 via cPanel, log in to your hosting control panel (usually available at a URL like https://yourmagentosite.com:2083/ or via your hosting provider’s dashboard).
In the search field at the top of cPanel, type “cron” and click on the Cron Jobs option in the Advanced section.
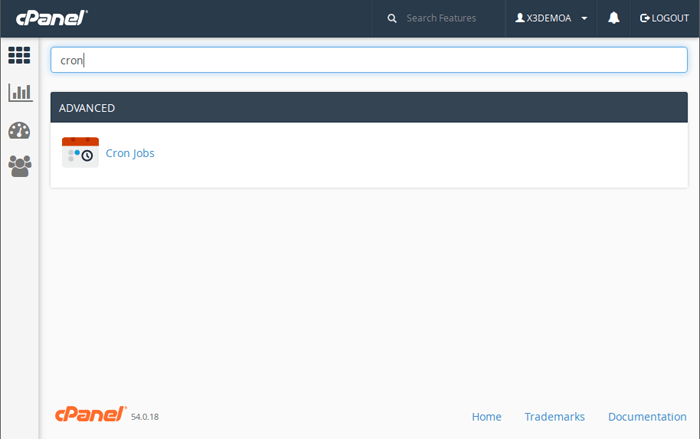
Before adding a job, you may be asked to specify an email address in the Cron Email section. This address will receive cron output and error messages, which can be very useful for troubleshooting cron execution issues.

Next, scroll down to the Add New Cron Job section:
Set the schedule – choose how often Magento cron should run. A common option is:
Minute: */1
Hour / Day / Month / Weekday: *
This means the cron will run every 1 minute.
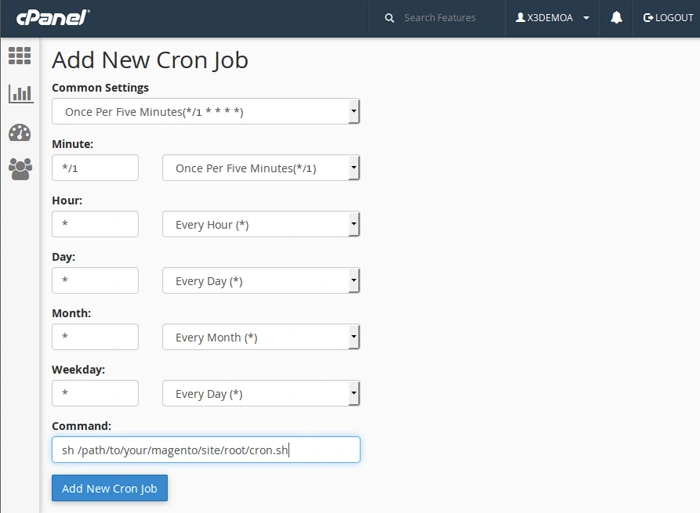
Сommand – use a command similar to this (adjust paths to match your hosting environment):
/usr/bin/php /home/username/public_html/bin/magento cron:run | grep -v
 "Ran jobs by schedule" >>
/home/username/public_html/var/log/magento.cron.log 2>&1
Replace:
/usr/bin/php with the correct path to PHP on your server (often visible in hosting docs or via cPanel).
/home/username/public_html with the actual path to your Magento 2 installation.
After you’ve set the timing and pasted the command, click Add New Cron Job to save your configuration.
From this point on, cPanel will trigger the Magento 2 cron according to the schedule you set, and Magento will handle all internal cron tasks (indexing, email sending, cleaning, custom jobs, etc.) automatically.
How to Run Magento Cron Manually
Sometimes you may need to run cron immediately — for testing or troubleshooting.
Via SSH
Log in to your server as the file‑system owner and run:
bin/magento cron:run
Run it at least twice:
The first pass identifies and schedules jobs.
The second pass executes the scheduled tasks.
You can also run cron for specific groups:
bin/magento cron:run --group index
This ensures only the indexer‑related cron tasks execute.
How to Schedule Magento Cron in a System Crontab
Magento cron needs to be triggered by your server at regular intervals. A typical cron entry (via crontab -e) looks like:
* * * * * /usr/bin/php /path/to/magento/bin/magento cron:run |
 grep -v "Ran jobs by schedule" >>
 /path/to/magento/var/log/magento.cron.log 2>&1
This instructs the system to run Magento’s internal cron every minute so it can dispatch tasks at the correct times.
If you prefer a 1‑minute interval for performance reasons, you can adjust to:
*/1 * * * * /usr/bin/php /path/to/magento/bin/magento cron:run …
However, Magento’s scheduler is designed to run most reliably with a 1‑minute system job.
Debugging and Monitoring Cron Jobs
Magento stores cron history in two main places:
The cron_schedule database table, with statuses such as pending, success, missed, and error.
The magento.cron.log file in var/log, where Cron events and exceptions are written.
How to Secure Magento 2 Cron
Securing Magento 2 cron jobs is crucial to prevent unauthorized access and ensure that sensitive tasks are not compromised. First, always run cron jobs under the correct non-root user, preferably the same user that owns your Magento files, such as www-data or nginx. Running cron jobs as a root user can lead to serious security vulnerabilities, so limit privileges and ensure only authorized users can trigger cron jobs. You can configure this by editing the system crontab file with:
sudo -u magento-user crontab -e
Another essential security measure is to limit the scope of cron tasks. Avoid running unnecessary or overly broad scripts, especially those from third-party sources. Always use absolute file paths in cron commands, and avoid relying on shell tricks or dynamic inputs that could be exploited. Also, ensure that any web-exposed cron scripts, such as those triggered via HTTP requests, are protected by authentication or IP whitelisting.
How to Manage and Adjust Cron Jobs in Admin
Magento offers only limited cron configuration in the admin panel. To drill deeper, for example, to see all scheduled jobs, reschedule them, or trigger them on demand, you can use tools like the Cron Schedule extension.
With this kind of extension, available options include:
Viewing all scheduled cron jobs in a grid
Filtering by group or status
Manually executing selected jobs
Changing a job’s schedule without code changes
Disabling or enabling cron tasks from the admin interface
To make cron management easier and more secure, consider using the Amasty Cron Scheduler for Magento 2. This extension adds a layer of convenience, offering an interface for monitoring, disabling, or enabling cron jobs directly from the Magento admin. It helps you secure and audit cron activities, ensuring that all tasks are only executed as needed, without touching the database or CLI, especially useful for stores with many extensions.
Check Cron Job Magento 2 status
To make sure cron is installed correctly on Magento 2 and your cron task works as it should, you can go and see over the changes that appear in the cron_schedule table of the Magento database. If its contents are changing, then you configured Magento 2 crons the right way.
NB: Do not manually change anything in this database table! At this point, everything you should do is watch.
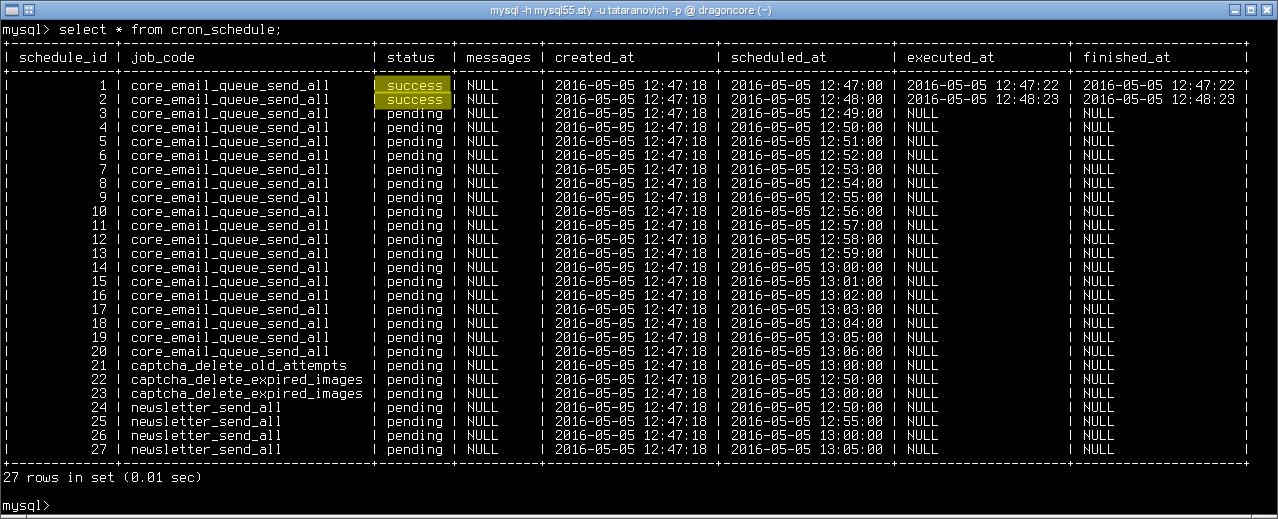
Here’s an example. We opened the table:
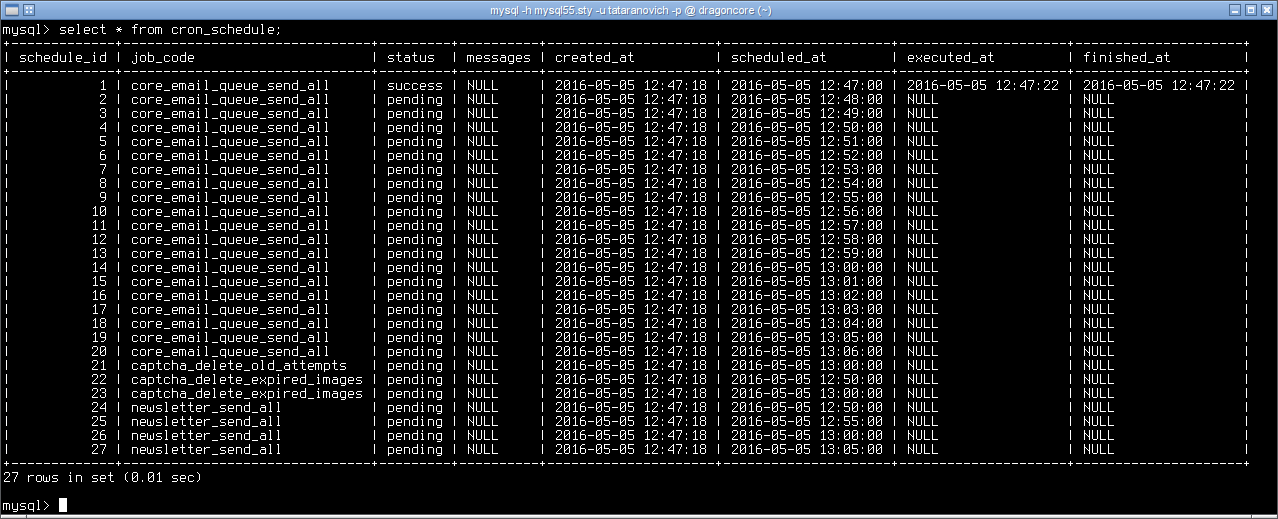
After waiting a bit, we see that the task was performed:
Common mistakes of Magento cron configuration
Making sure the instructions are valid
From our experience, the most common mistakes while setting cron on any website are caused by copying instructions from the Internet. Very often those instructions are correct but need adaptation for your server or were correct at the moment when the article was written but aren’t correct anymore.
To make sure you are using the correct instructions, refer to your hosting company support articles or ask your system administrator.
For example, a random article says that the cron job command looks like this:
[php]*/1 * * * * /var/www/magento/cron.sh[/php]
This is correct, but you also should remember, that permissions for /var/www/magento/cron.sh file should allow its execution. Here’s a universal method where you let the command interpreter to execute the file:
[php]*/1 * * * * sh /var/www/magento/cron.sh[/php]
Here’s another example of a command taken from a random article:
[php]*/1* * * * /usr/bin/php /var/www/magento/cron.php[/php]
What if it doesn’t work for you? Maybe in your case, PHP is installed into another folder (such as /usr/local/bin/php or /opt/php/bin/php), so it’s better to use cron.sh file, which searches for the PHP interpreter itself.
Using email address for cron
Make sure you use the correct email address in MAILTO. If there’s an issue with cron task execution, you will receive an email with the error description, which in case of troubles will help you to understand what went wrong.
Here’s how to set cron for Magento and add an email address for receiving messages:
[php]MAILTO="webmaster@example.com"
*/1 * * * * php /path/to/magento/bin/magento -- --quiet cron:run[/php]
As always, don’t forget to replace the example address with your own email and insert the correct path to your Magento default folder.
Output redirection issues
Another common mistake you should know about is output redirection to /dev/null. It is used if some warnings are reported during the cron task executions, and the owner doesn’t want to correct the issues. Here’s how the command looks like:
[php]*/1 * * * * sh /var/www/magento/cron.sh >/dev/null 2>&1[/php]
In that case, any output from the cron task is suppressed to avoid receiving constant warning messages. The thing is, if somehow some fatal errors are caused during cron Magento execution, you won’t know about them, too, and it can slow down the investigation and get rid of the troubles.
The same effect can be seen if you set an empty MAILTO.
Magento 2 cron not running
Try flushing the cache and running cron again:
php bin/magento cache:flush
php bin/magento cron:run
Magento 2 runs specific cron jobs manually
Any manual manipulations can result in errors. To eliminate risks, you can acquire any of these free or paid extensions on the market.
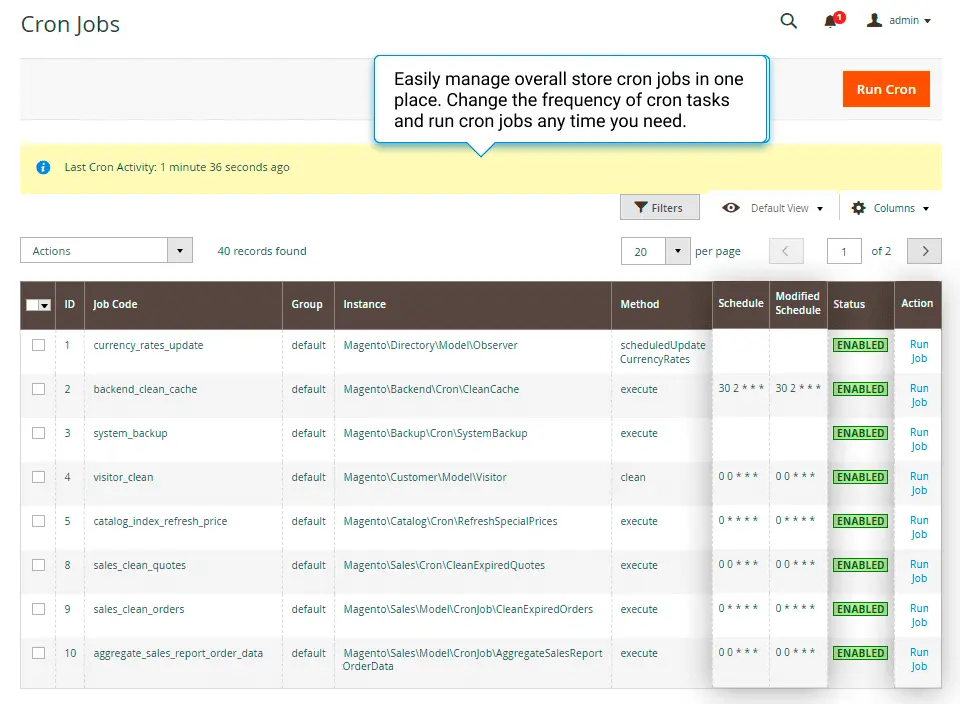
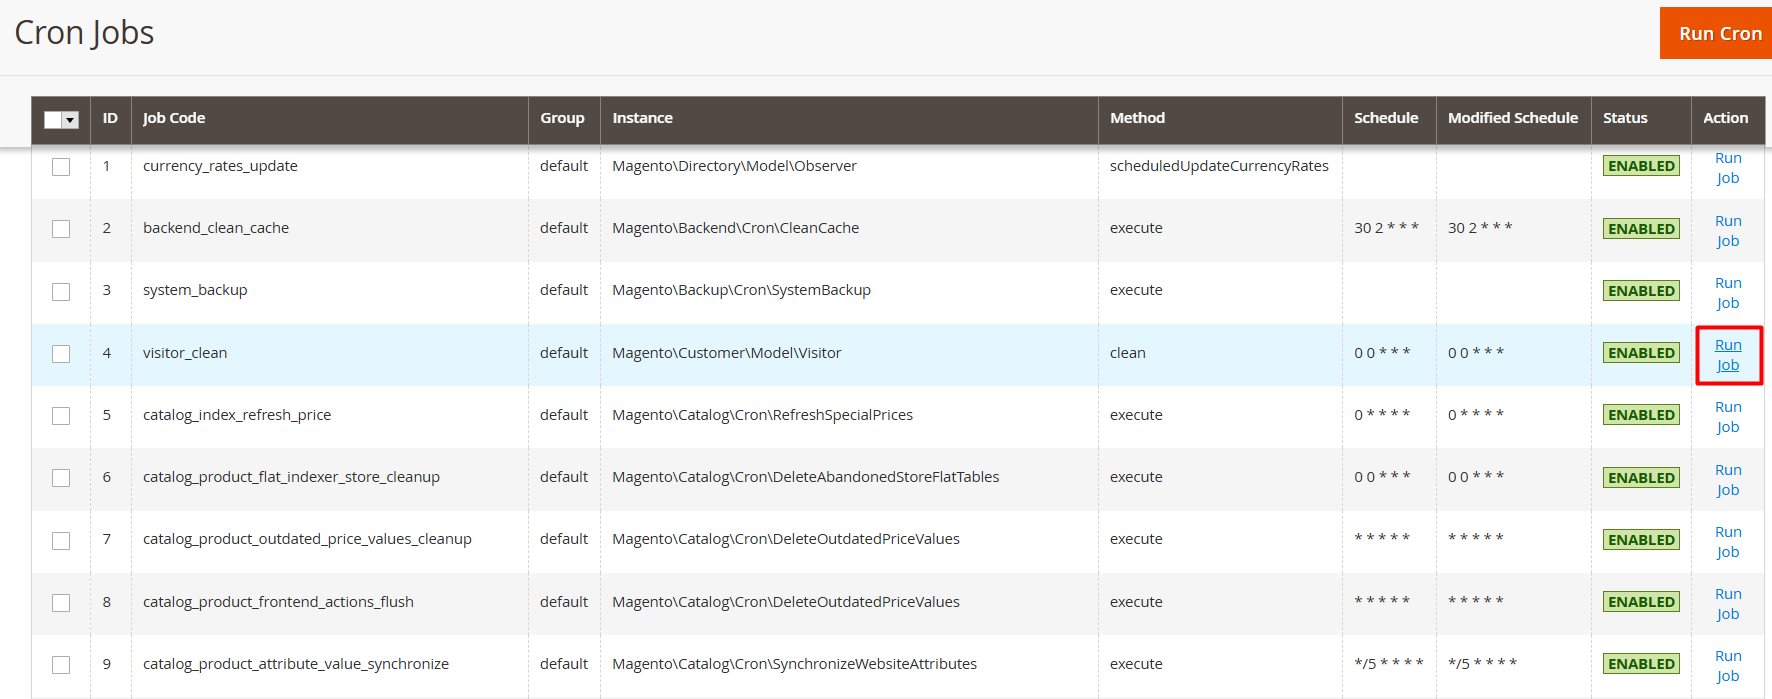
For example, Amasty Cron Scheduler gathers all Magento cron jobs of third-party modules together with native Magento ones on a special Magento 2 Cron Jobs List grid. There you can see all the related information, like cron jobs, statuses, groups, and schedules.
To run a specific job manually, navigate to System > Cron Jobs List > then click the Run Job button to start cron run and create tasks for a particular cron job:
Best Practices for Cron Setup
Test on a staging environment first before applying cron settings to production.
Use SSH access and run cron commands as the Magento file system owner.
Monitor cron_schedule and logs to catch failures early.
Keep your server’s PHP CLI version consistent with production settings.
If you have multiple cron groups, consider enabling separate processes when appropriate (via admin settings).
Summing It Up
Configuring cron jobs in Magento 2 is not a bed of roses, of course, but we hope that this article was helpful for you. If you still feel like you don’t fully understand what to do, and it's a quite possible scenario, don’t hesitate to turn to a specialist.
Frequently Asked Questions
Cron in Magento is a scheduled task system that runs automated jobs at specific intervals in the background. These jobs handle things like reindexing, sending order and newsletter emails, generating sitemaps, cleaning logs, updating currency rates, and running custom module tasks. Instead of doing these actions manually, Magento relies on cron to execute them regularly and keep the store healthy and up to date.
To make sure Magento cron is running correctly, you can:
Check the system crontab – On the server, verify there’s a cron line calling bin/magento cron:run (usually every minute).
Look at cron_schedule table – In the database, confirm that jobs have statuses like pending, success, and that new rows are being created over time.
Check log files – Review var/log files (for example, custom logs from your cron classes or magento.cron.log if you configured one) to see if jobs are executed without errors.
Run cron manually – Execute bin/magento cron:run from the command line and see if any errors appear.
If jobs are not moving from pending to success, or nothing appears in logs, your system cron or Magento cron configuration likely needs fixing.
A Magento 2 cron schedule extension is a module that gives you a visual interface in the admin panel to monitor and manage cron jobs. Instead of checking the database directly, you can:
See a list of all configured cron jobs
View their status (success, pending, error)
Check next and last run times
Filter or search for specific jobs
Sometimes manually trigger or retry jobs
Such extensions make it easier for admins and developers to debug issues, ensure critical tasks are running on time, and keep the overall scheduling system under control without digging into the command line or database every time.